Long story short (this backstory is the only thing that’s short about this post), I’m ridiculously behind in my RSS reader, but I’m working through it, as I refuse to Mark as Read en masse. One of the articles that I decided to carefully read through and follow along with is Thomas LaRock’s (blog | @SQLRockstar) SQL University post from Jan 19 (SQL University info).
Since one of my “goals” for this year is to learn PowerShell (if I stay a DBA), I followed the steps to get a feel for things (I’ve used PoSh before, but pretty much only in a copy-and-paste sense), and although the first couple commands worked as advertised, they were accompanied by some errors:
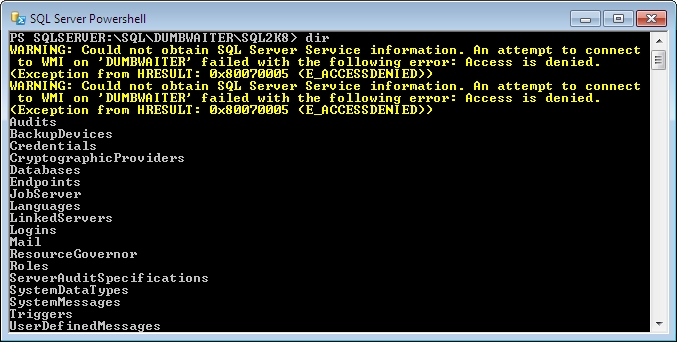 At first, it seemed a little odd to be getting Access Denied errors while all of the commands I was running were working. The “SQL Server Service” part & mention of WMI made it sound like a Windows-level function that the warnings were about. The commands I was running only dealt with SQL server, which could explain why they were working.
Alright, let’s back up a bit & go over the environment a little bit.
Principle of Least Privilege
The SQL Server I was connecting to is on a different machine on the network, not a local instance. Although my Windows account has SA rights on SQL, it doesn’t have any rights on the box itself (ie, not a local admin). Even though this is just equipment in the house, I have as much set up as I can in accordance with the Principle of Least Privilege. I both think this is a good idea and it gives us a more realistic environment to do testing and experimentation in.
(This whole exercise is actually a good example of why I have things set up this way: If I had gone to do anything with PoSh on, for example, our Accounting server at work, I would have run into this same situation, as the DBAs don’t have Local Admin on those servers. Instead of being surprised by this and having to run down what is going on and how to fix it, I already found it, figured out the problem & now would know what needs to be requested at the office.)
Since my account doesn’t have Admin access to the Server itself, it makes sense that I didn’t have rights for the system’s WMI service, especially remotely. Unfortunately, at the time, I hadn’t thought through the different parts of the system that PoSh was trying to touch, so I generally went in search based on the warning message.
What do WMI & DCOM have to do with Powershell?
WMI (Windows Management Instrumentation) is, put pretty simply, a way to get to administrative-type information about a machine. There are lots of ways to interact with it, and at the end of the day, it can be summed up as a way to programmatically interact with a Windows system. An example of something it can do is, say, return the status of a Windows Service…
DCOM (I had to look this chunk of stuff up) is a communication protocol used for inter-server communications by MS technologies. That’s a pretty stripped-down definition, too, but that’s the general idea.
WMI uses DCOM to handle the calls it makes to a remote machine. Since when we start it up from SSMS, Powershell seems interested in checking the status of the SQL Server service (I tried to find documentation of this, but couldn’t find anything), it makes a remote WMI call to do that. Out of the box, Server (2008 at least), doesn’t grant that right to non-Administrators, which was causing the Warning message I was getting.
Granting Remote WMI/DCOM Access
Interestingly, while searching for a resolution to this, I didn’t find anything that related to Powershell at all, let alone SQL Server specifically. For some reason I got distracted by this and wound up flopping around on a bunch of unhelpful sites and coming around the long way to a solution. However, I think this did help me notice something that I didn’t find mentioned anywhere. I’ll get to that in a second.
Here’s a rundown of what security settings I changed to get this straightened out. I’m not sure how manageable this is, but I’m going to work on that next. I’m fairly certain that everything I do here can be set via GPO, so it will be possible to distribute these changes to multiple servers without completely wanting to stab yourself in the face (and talking your Sysadin into doing it).
One of the first pages I found with useful information was this page from i-programmer.info. Reading that and this MSDN article at basically the same time got things rolling in the right direction.
Step 1: Adjust DCOM security settings
Fire up Component Services; easiest way to do this is Start | Run (Flag-R), and type in/run DCOMCNFG. Navigate to this path: Component Services\Computers\My Computer\DCOM Config\. Find Windows Management and Instrumentation, right-click on it, and choose Properties. On the Security tab, set the first two, “Launch and Activation Permissions” and “Access Permissions” to “Customize.” Click the Edit button in both of these sections and add the AD group that contains the users you want to grant access to (always grant to groups & not individual users). I checked all options in both of these places, as I want to allow remote access to DCOM.
Step 2: Add users to the DCOM Users group
The MSDN article mentioned a couple paragraphs up references granting users rights for various remote DCOM functions. While looking to set this up, I noticed something that no other article I read had mentioned (this is that bit I mentioned earlier), but I think is an important thing to cover, as it is a better way to deal with some of the security settings needed.
To see this, go back to Component Services, scroll back up to “My Computer” at the top and go to Properties again. On the “COM Security” tab, you will find two different sets of permissions that can be controlled. Click on one of the “Edit Limits” buttons (it doesn’t matter which one). The dialog will look something like this:
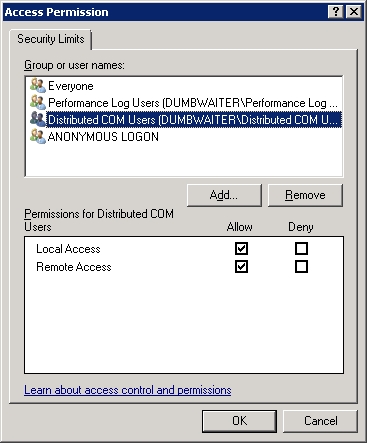
Distributed COM Users? ORLY?
A built-in security group for DCOM users? What is this? Well, turns out, it’s exactly what it sounds like it is—it’s a built-in group that already is configured to grant its members the rights needed for remote DCOM access.
That group makes this part of the setup really easy: Simply add the group containing, say, the DBAs, to this built-in group, and they magically have the needed remote DCOM rights. There’s no need to mess with the permissions on the COM Security tab talked about in this section.
Once to this point, I found that when I would run PS commands, I was now getting a different message:
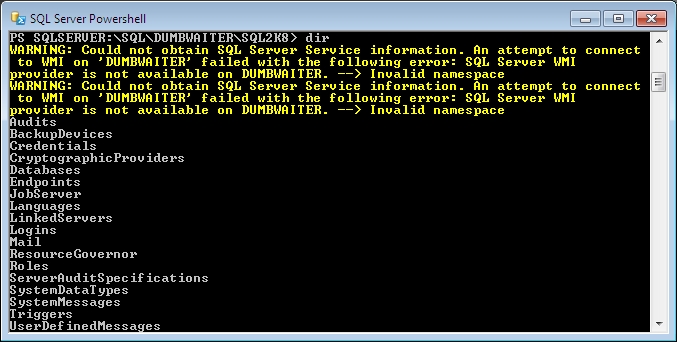
The same root problem exists (“Could not obtain SQL Server Service information”, but the Access Denied part is gone, now replaced by an invalid WMI namespace message. That was much easier to troubleshoot, as it was only a WMI problem now. My assumption is that it was security-related, and that was the case, but as I found out, since I hadn’t dealt with the details of WMI security, there’s a little quirk that wound up making me burn a lot more time on this than I needed to.
Step 3: Adjust WMI security
The WMI Security settings are easier to get to than the DCOM stuff (at least it seems that way to me). In Server Manager, under Configuration, right below Services, is “WMI Control.” Right-click | Properties, Security Tab, and there ya go.
Now, here’s where some decisions need to be made. Basically, there are two options:
Grant access to everything
Only grant access to the SQL Server stuff.
Of course the easy way is to grant everything, but if these things are being changed in the first place, because a DBA doesn’t have Local Admin on the server, then that probably won’t line up with the in-use security policies.
Instead, the best thing is probably to set security on the SQL Server-specific Namespace. The path to this namespace is Root\Microsoft\SqlServer. Click on that folder, then hit the Security button. A standard Windows security settings dialog will come up. Add the desired user/group (again, probably the DBA group) here & add Execute Method & Remote Enable to the default as that should be the minimum needed. Don’t hit OK yet, however, as this is where the afore-mentioned quirk comes in.
By default, when you add a user & set rights in this WMI security dialog, it adds only for the current namespace—no subnamespaces are included. I got horribly burned by this because I’m used to NTFS permissions defaulting to “this folder & subfolders” when you add new ACLs.

Advanced WMI Security dialog
To fix this, click Advanced, then select the group that was just added, and click the Edit button. That will open the dialog shown above, at which point the listbox can be changed to “This namespace and subnamespaces.”
With all of that set, running SQL Server PowerShell commands should run successfully & not report any Warnings.
Firewall rules & other notes
I only addressed security-related settings here. In order for all of this to work, there may also be some firewall rules adjusted to allow DCOM traffic in addition to what is needed for PoSh access.
Putting my sysadmin hat on for a little bit, if a DBA came to me asking to change these settings, my response could be, “well that’s fine and all, but you really want me to make these changes on all dozen of our DB servers??” This is where Group Policies come in. I haven’t worked through the GPO settings needed to deploy these settings, but as I mentioned before, I’m pretty sure all of this can be set through them. I will work through that process soon & likewise document it as I go. Stay tuned for that post.
A slightly funny bit about this entire thing is due to the amount of time it took me to get this post together, I haven’t actually done anything related to Powershell! Whoops.
Good luck with Powershell everyone… I’ll get caught up eventually.
